Hey everyone, let’s dive into the world of Chery Tiggo SEVEN, PRO, and MAX bulbs! We’re going to cover everything you need to know about replacing those bulbs, focusing on the front and rear optics, and of course, those all-important specifications.
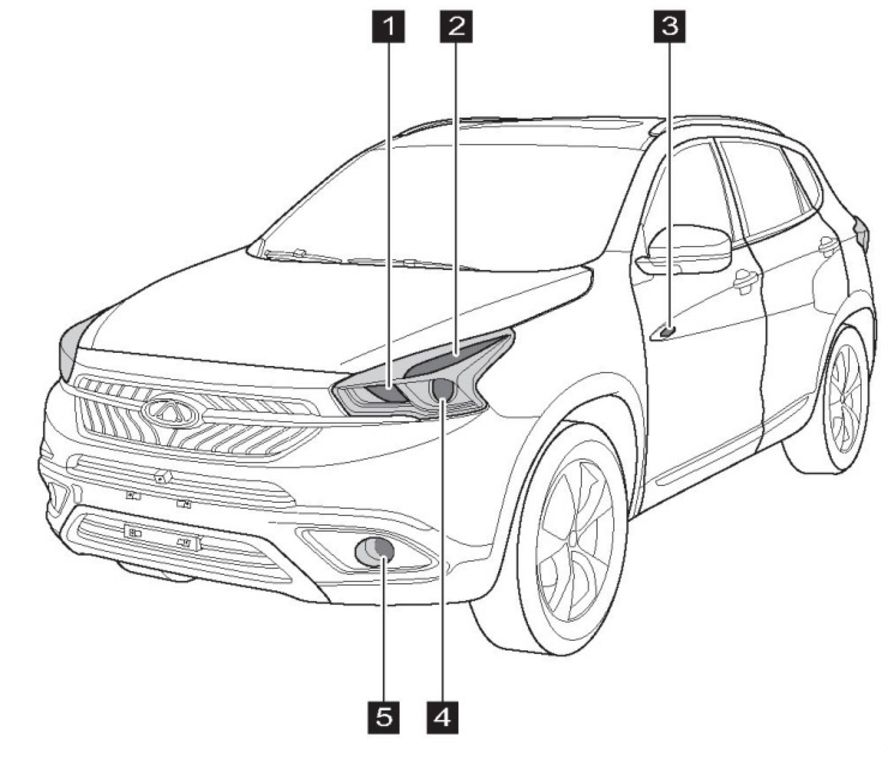
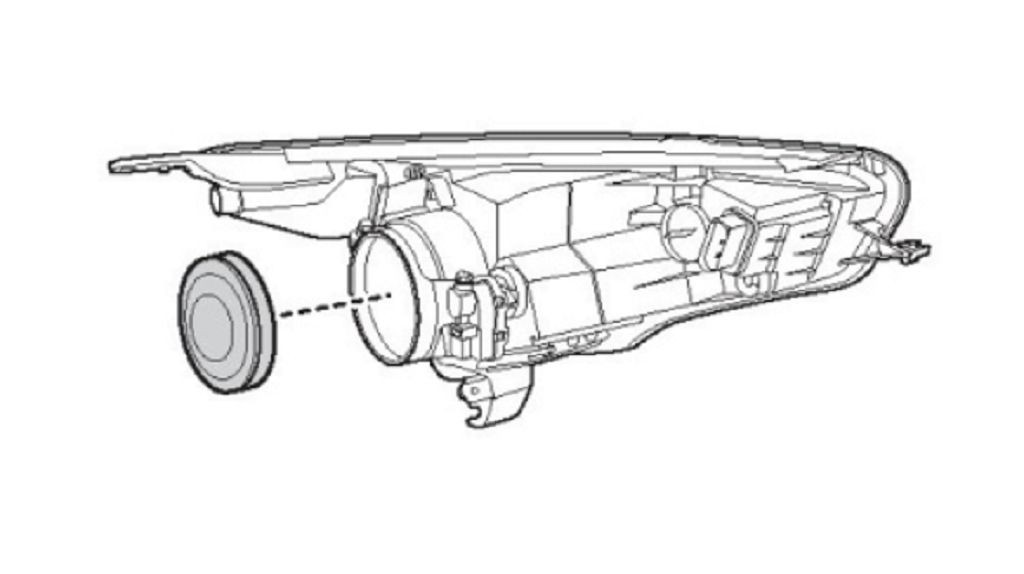
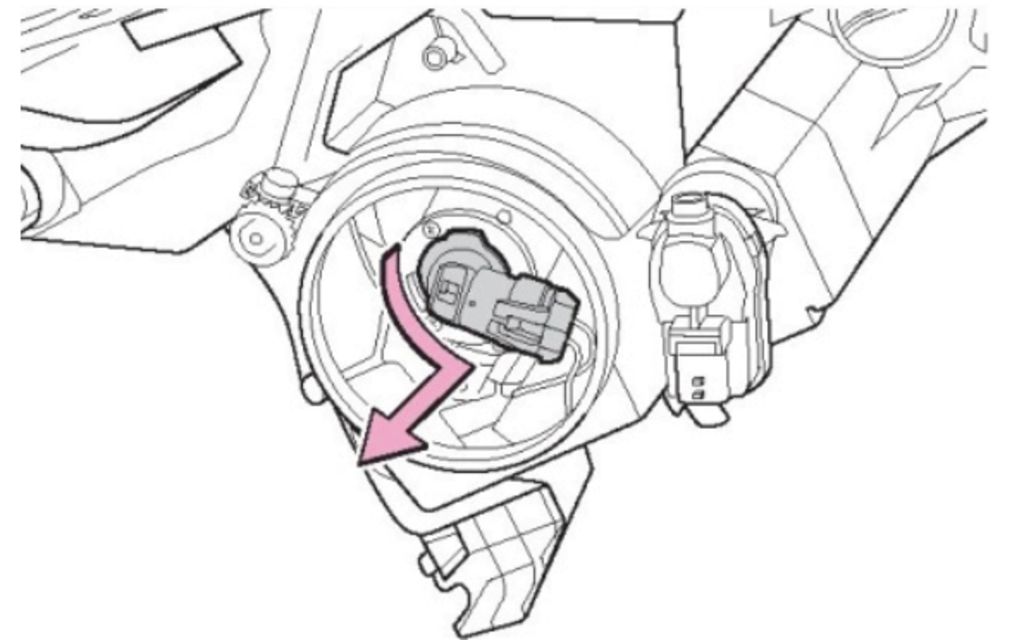
First up, let’s talk about the front optics of your Chery Tiggo SEVEN, PRO, or MAX. These are the headlights, and they’re crucial for safe night driving. We’ll be looking at both the low beam and high beam bulbs. Now, depending on your specific model year and trim level, you might have halogen bulbs, or you might already have LEDs. We’ll cover both scenarios. If you have halogens, we’ll go through the process of safely removing the old bulbs, making sure you don’t accidentally break anything, and then installing the new ones. We’ll show you exactly how to access the bulb housing, what kind of tools you’ll need, and the proper way to connect the new bulb to ensure it works correctly. We’ll also discuss the different types of halogen bulbs available and what to look for when choosing a replacement. For those with LED headlights, the process is slightly different, but we’ll walk you through it step-by-step, ensuring you understand how to safely access and replace the LED units without damaging the delicate components. We’ll also discuss the differences between various LED options, highlighting factors like brightness, lifespan, and color temperature. Remember, always check your owner’s manual for specific instructions for your model.
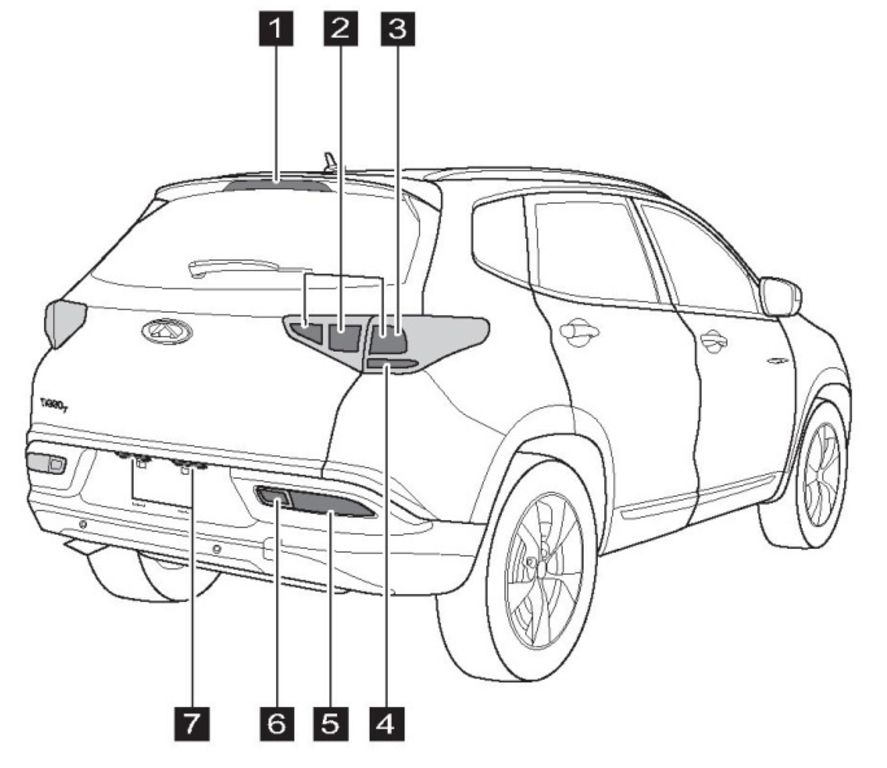
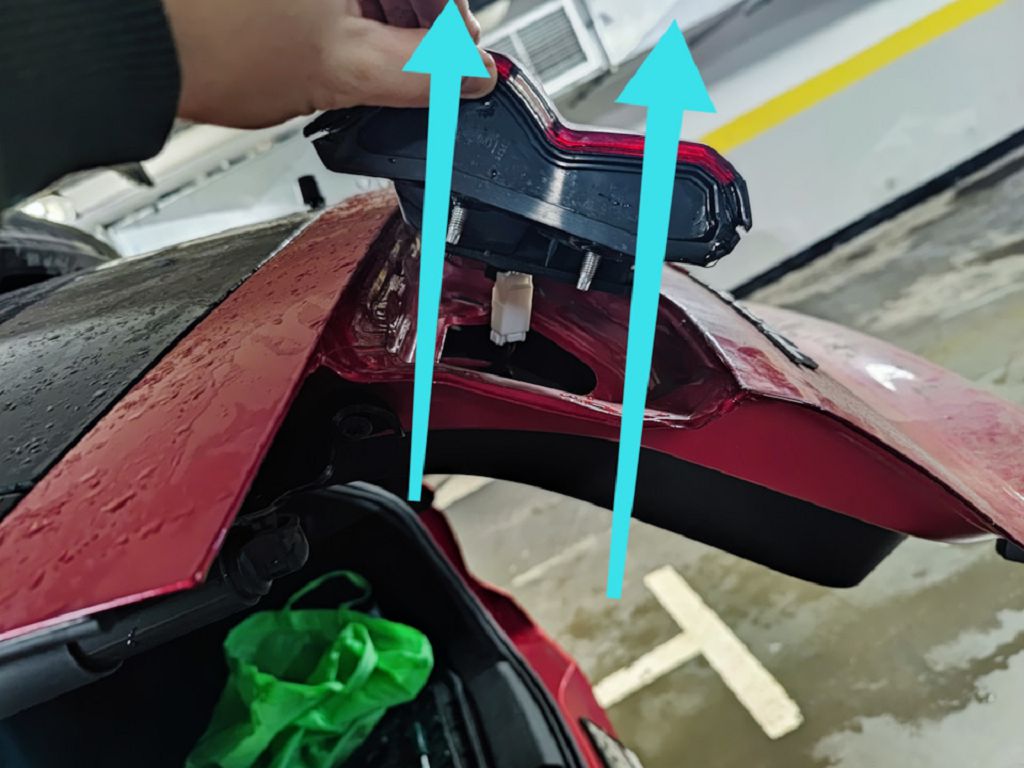
Next, let’s move to the rear optics. These include your taillights, brake lights, reverse lights, and turn signals. Again, we’ll cover both halogen and LED options. The process of replacing these bulbs is generally easier than the front headlights, but it’s still important to do it correctly. We’ll show you how to access the bulb housings, which often involve removing panels or covers. We’ll also discuss the different types of bulbs used in the rear optics and their specific functions. For example, you’ll learn about the differences between single-filament and dual-filament bulbs, and how to identify the correct bulb for each function. We’ll also cover the importance of using bulbs that meet the legal requirements for your region. We’ll show you how to safely remove and install each type of bulb, ensuring you don’t damage any surrounding components.
Now, let’s get into the nitty-gritty: the Chery Tiggo SEVEN bulb specifications. This is where things get a little technical, but don’t worry, we’ll break it down. We’ll provide you with a comprehensive list of the bulb types used in your Chery Tiggo SEVEN, PRO, and MAX, including the specific part numbers. This will make it much easier for you to find the correct replacement bulbs at your local auto parts store or online. We’ll cover the specifications for both the front and rear optics, including the wattage, voltage, and base type for each bulb. This information is crucial for ensuring you choose the correct replacement bulbs that are compatible with your vehicle’s electrical system. We’ll also discuss the importance of using bulbs that meet the manufacturer’s specifications to avoid any potential issues. Remember, using incorrect bulbs can lead to problems with your vehicle’s lighting system, so getting the right specifications is absolutely key. We’ll also provide some tips on how to find this information if you can’t locate your owner’s manual. We’ll show you where to look on the bulbs themselves, and where to find this information online. We’ll also show you how to decode the bulb codes to understand exactly what each number and letter means. This will empower you to confidently choose the right replacement bulbs for your Chery Tiggo.
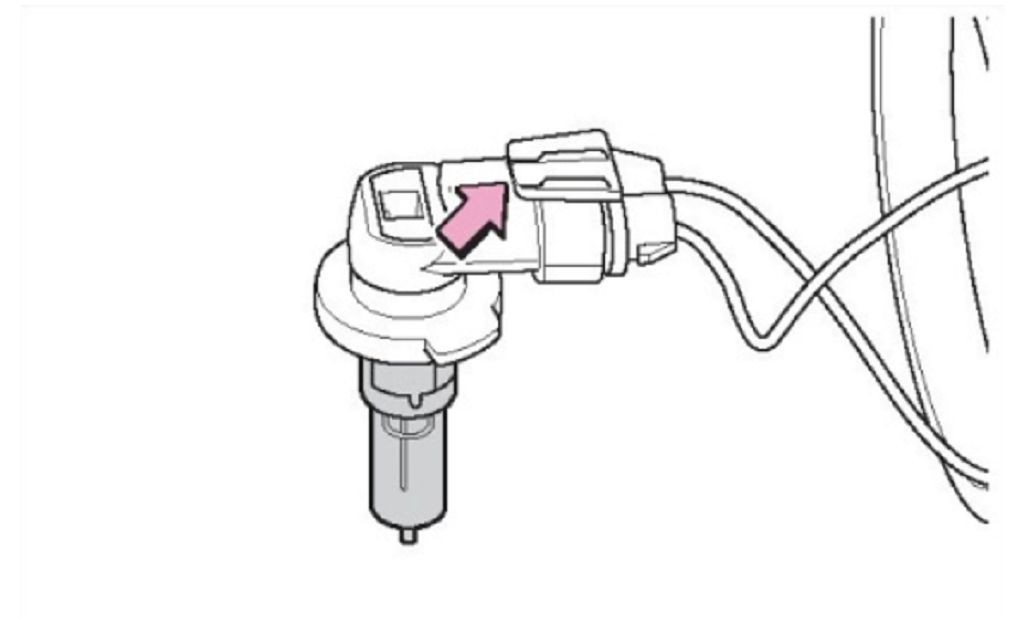
Okay, let’s dive straight into replacing those bulbs on your Chery Tiggo SEVEN/Pro/Max. First up, we’re tackling the dipped beam and high beam bulbs. Now, depending on your model year and trim level, you might have halogen bulbs or already have LEDs. If you have halogens, replacing them is a pretty straightforward process. You’ll usually need to access the back of the headlight assembly, often by removing a cover or accessing it from the engine bay. Consult your owner’s manual for the exact procedure, as it varies slightly between models. Once you have access, you’ll typically find a retaining clip or a small twist-lock mechanism holding the bulb in place. Carefully release this, and then gently pull the old bulb out. Make sure you don’t touch the glass part of the new bulb with your bare fingers – use a clean cloth or gloves. Insert the new bulb, making sure it clicks securely into place. Then, reassemble everything and test your lights. If you have LEDs, the process might be slightly different, potentially involving disconnecting connectors rather than simply removing a bulb. Again, your owner’s manual is your best friend here. Remember to always double-check that everything is securely fastened before you drive off.
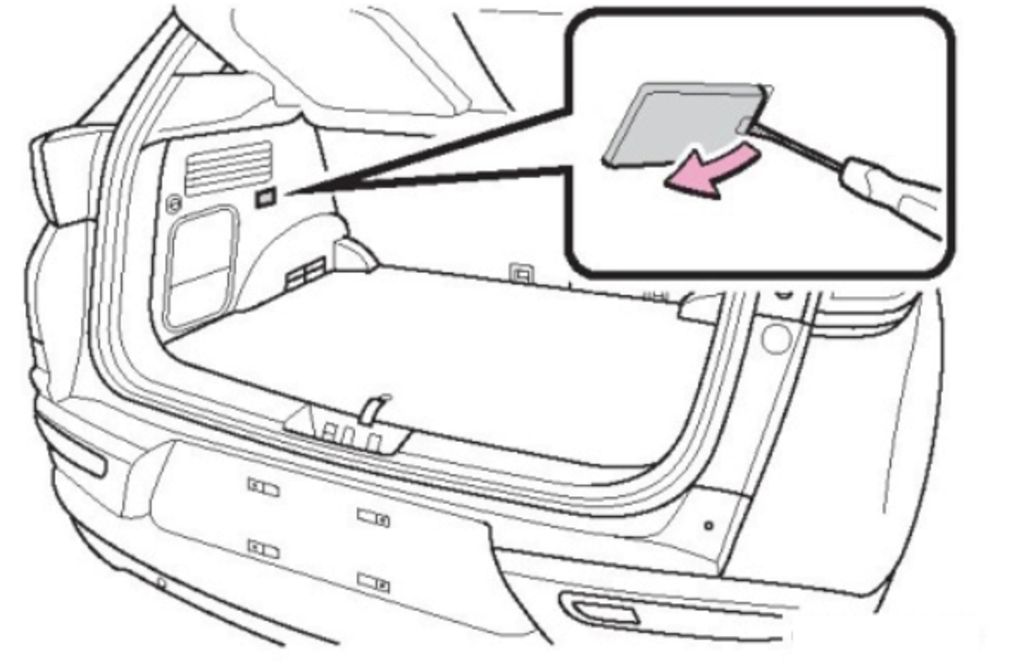
Next, let’s move on to the luggage compartment bulb. This is usually a simple replacement. You’ll typically find a small access panel inside the luggage compartment itself, often near the light fixture. Open this panel, and you should see the bulb. It’s usually a standard wedge-base bulb, often a FIVE-watt or TEN-watt. The exact specification will be in your owner’s manual, so check that before you head to the store. Simply twist the old bulb out and replace it with a new one of the same type and wattage. Make sure it’s securely seated before closing the access panel. It’s a good idea to keep a spare luggage compartment bulb in your car, just in case.
Now, let’s talk about the Chery Tiggo SEVEN Pro and Chery Tiggo SEVEN Pro Max bulb specifications. These can vary slightly, so again, your owner’s manual is the definitive source. However, generally, you’ll find that the specifications for common bulbs like the headlights, taillights, and brake lights are fairly standard across the range. Pay close attention to the wattage and the bulb type (e.g., H SEVEN, H ONE, etc.) to ensure you’re getting the correct replacements. Don’t just rely on the shape; the wattage is crucial for safety and proper function.
Moving on to the taillights. Replacing these bulbs can be a little more involved than the others, depending on your model. You might need to access them from inside the trunk or from the wheel well. Consult your owner’s manual for the specific instructions. Once you have access, you’ll likely find a similar retaining clip or twist-lock mechanism as with the headlights. Carefully remove the old bulb and replace it with a new one, ensuring it’s securely fitted. Again, avoid touching the glass part of the bulb with your bare hands. Test your taillights thoroughly after replacement to ensure they’re working correctly.
Finally, let’s cover the reversing lights. These are usually located in the rear bumper or within the taillight assembly itself. The replacement process is similar to the taillights – you’ll need to access the bulb, usually by removing a cover or accessing it from the inside of the vehicle. Once you have access, carefully remove the old bulb and replace it with a new one, making sure it’s securely seated. Test your reversing lights before you drive away to ensure they’re functioning properly. Remember, always refer to your owner’s manual for the most accurate and detailed instructions for your specific Chery Tiggo SEVEN/Pro/Max model. Safety first!
- Читайте также: