Hey everyone, let’s dive into the world of Chery Tiggo SEVEN/PRO/MAX batteries. Specifically, we’re tackling something that’s puzzled a lot of owners: those battery requirements. It’s not always straightforward, is it? You’d think finding a replacement battery for your car would be simple, but with the Tiggo SEVEN, PRO, and MAX models, there are some nuances to consider. First off, let’s talk about the factory-fitted battery. You’ll find that the specifications vary slightly depending on the exact model year and trim level of your Tiggo. But generally, we’re looking at a battery with a certain cold cranking amps rating – crucial for those chilly mornings – and a specific capacity measured in amp-hours. This capacity dictates how long the battery can power your car’s electrical systems before needing a recharge. Finding the exact specifications on your battery is key, and I highly recommend checking your owner’s manual for the precise details. Don’t rely on guesswork here; getting the wrong battery can lead to problems.
Now, let’s talk about alternatives. Because finding the exact same battery might not always be easy, especially depending on your location, understanding your options is vital. You’ll find that many reputable battery manufacturers offer batteries that meet or exceed the specifications of your original Chery Tiggo battery. The key is to match the cold cranking amps and amp-hour capacity. Don’t just look at the physical size; ensure the electrical specifications are compatible. Going for a higher cold cranking amps rating is generally a good idea, as it provides extra power for starting your engine, especially in cold weather. However, going too high might not be necessary and could even be detrimental. Sticking to the recommended specifications is usually the safest bet. When choosing an alternative, look for reputable brands known for their quality and reliability. Read reviews and compare prices before making your decision. Remember, a good quality battery is an investment in the smooth running of your vehicle.
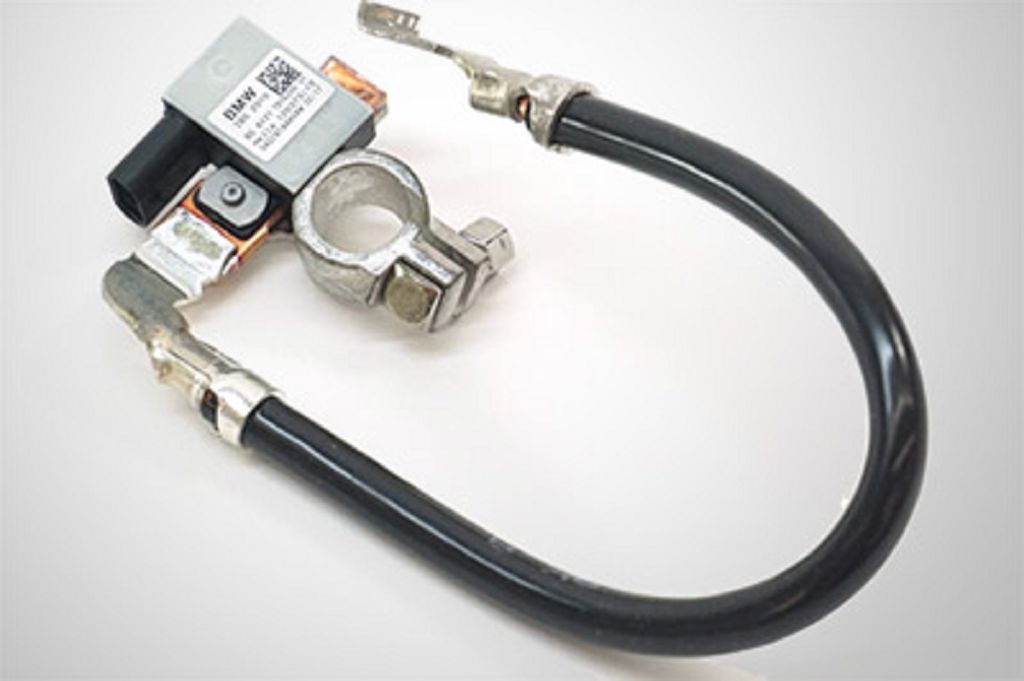
And finally, let’s address that mysterious third wire. Many Chery Tiggo SEVEN/PRO/MAX owners have noticed an extra wire on their battery terminals. This isn’t a fault; it’s a feature. This third wire is often connected to the car’s onboard computer system, allowing for monitoring of the battery’s health and charging status. Disconnecting this wire can trigger warning lights on your dashboard or even prevent your car from starting. So, if you’re replacing your battery, be extra careful to reconnect this third wire correctly. If you’re unsure, consult a qualified mechanic. It’s a small detail, but it’s crucial for the proper functioning of your vehicle’s electrical system. Ignoring it could lead to more significant issues down the line. So, treat this third wire with respect!
Okay, let’s dive straight into this Chery Tiggo 7/PRO/Max battery mystery! First up, we’re talking about the IBS system – that’s the Intelligent Battery Sensor. It’s a small but crucial component that monitors your battery’s health and charging status. Think of it as a tiny computer constantly checking in on your battery’s voltage, current, and temperature. This data is then sent to your car’s computer, allowing it to manage the charging process more efficiently and warn you of any potential problems before they become major issues. It’s all about preventing a sudden battery failure, leaving you stranded. Understanding the IBS is key to understanding why we have that extra wire on the battery. It’s the communication line between the battery and the car’s brain. Without it, the car’s system can’t accurately monitor the battery’s performance. Now, this isn’t something you can just ignore; it’s an integral part of the system.
Next, let’s get our hands dirty and talk about removing and installing the battery. This isn’t rocket science, but it’s important to do it correctly. First, always disconnect the negative terminal FIRST – that’s the black one. Then, disconnect the positive terminal – the red one. Remember, safety first! Before you even touch anything, make sure your car is completely turned off. Now, you’ll likely need a wrench to loosen the clamps holding the battery in place. Once those are loose, carefully lift the battery out. Installing a new one is the reverse process. Make sure the positive and negative terminals are connected correctly – you don’t want to accidentally short-circuit anything! And remember, the IBS wire needs to be connected to its designated spot on the new battery. If you’re not comfortable doing this yourself, it’s always best to take it to a professional. A simple mistake can cause significant problems.
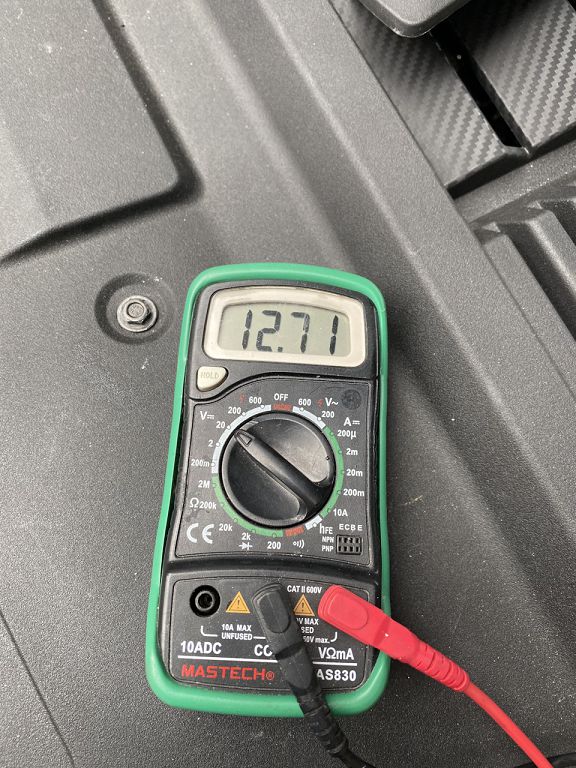
Now, the big question: is it the battery or the alternator? This is where things can get tricky. A failing battery can exhibit similar symptoms to a failing alternator, like dimming headlights or a slow engine crank. The IBS system can help diagnose this, giving you valuable data. If the IBS is reporting low voltage consistently, even after a full charge, it points towards a faulty battery. However, if the voltage is dropping while the engine is running, it could indicate a problem with the alternator, which is responsible for charging the battery. A simple voltage test with a multimeter can help you pinpoint the culprit. You can test the voltage at the battery terminals with the engine off and then with the engine running. A significant drop in voltage while the engine is running strongly suggests an alternator problem. But again, if you’re unsure, it’s always best to seek professional help. Misdiagnosing this can lead to unnecessary expenses and further damage. Remember, a healthy battery and alternator are essential for your car’s smooth operation. Don’t underestimate the importance of regular checks and maintenance.