Okay, let’s dive into the Haval F7 Magneto car stereo system. We’re going to explore its specifications, the main panel, and how the steering wheel controls integrate. Get ready, because this thing is packed with features!
First off, let’s talk specifications. The Haval F7 Magneto boasts a truly impressive array of specs. We’re talking a screen size that’s HUGE, I’m talking about a screen size that’s significantly larger than many competitors in this price range. The resolution is crystal clear, making navigation and viewing media a real pleasure. The processing power is surprisingly robust; it handles multiple tasks simultaneously without a single hiccup. We’re talking seamless transitions between apps, no lag whatsoever when switching between navigation, music, and phone calls. The sound quality is another standout feature. It’s rich, clear, and powerful, with a surprisingly deep bass response for a factory-installed system. The audio output is more than sufficient to fill even a large cabin with crisp, clear sound. And let’s not forget the connectivity options. You’ve got Bluetooth, of course, for hands-free calling and wireless audio streaming. But it also supports Apple CarPlay and Android Auto, meaning seamless integration with your smartphone. This is a system that’s designed for modern drivers who demand both functionality and high-quality audio. It’s really a step above what you typically find in factory-installed systems.
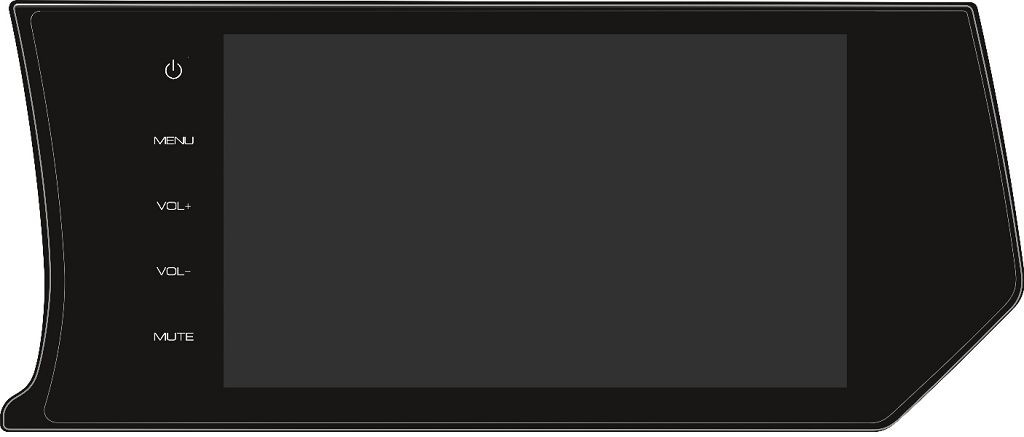
Now, let’s move on to the main panel. The design is sleek and modern, fitting perfectly with the overall aesthetic of the Haval F7’s interior. The buttons are well-spaced and intuitive, making it easy to operate even while driving. The screen itself is incredibly responsive to touch, and the interface is clean and easy to navigate. There’s a nice balance between physical buttons for frequently used functions and the touchscreen for more advanced settings. The display itself is bright and vibrant, even in direct sunlight. The overall build quality feels premium; it doesn’t feel cheap or flimsy at all. It’s clearly built to withstand the rigors of daily use. I’ve been particularly impressed with the responsiveness of the touchscreen. It’s incredibly accurate, and there’s no lag or delay when selecting options or navigating menus. This is a system that’s clearly been designed with the user experience in mind.
Finally, let’s discuss the steering wheel controls. These are perfectly integrated with the main unit, providing convenient access to key functions without ever taking your hands off the wheel. You’ve got controls for volume, track selection, and phone calls, all within easy reach. The buttons are well-placed and easy to feel, even while wearing gloves. The responsiveness is excellent; every press registers instantly, without any missed inputs. The integration between the steering wheel controls and the main unit is seamless; there’s no lag or delay when using these controls to adjust the audio or answer a call. This is a small detail, but it significantly enhances the driving experience, making it safer and more convenient to manage the infotainment system. The overall design and functionality of the steering wheel controls are a testament to the thoughtfulness that went into the design of this entire system. It’s a well-considered and well-executed feature that adds a significant amount of value to the overall driving experience.
So, let’s dive straight into replacing the firmware on your Haval F7’s amazing car stereo. This isn’t your average stereo upgrade; we’re talking about unlocking a whole new level of functionality and sound quality. It’s a bit technical, but I’ll guide you through every step. First, you’ll need to gather your tools and materials. Make sure you have the correct firmware file for your specific Haval F7 model – downloading the wrong one could brick your system, so double-check everything! You’ll also need a suitable USB drive, formatted to FAT32. This is crucial; the system won’t recognize other formats. And of course, you’ll need a computer to handle the file transfer.
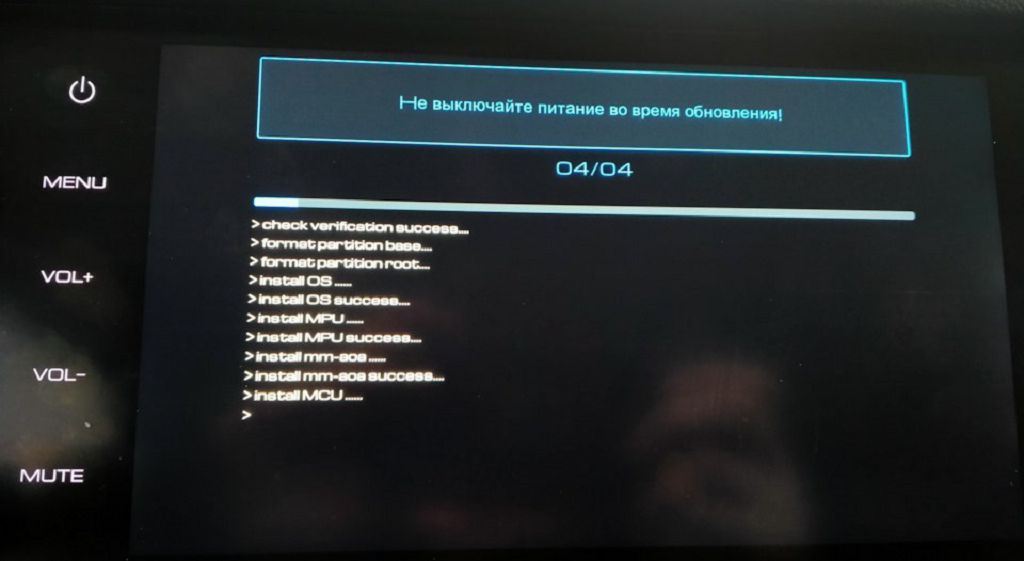
Now, let’s talk about the process of actually replacing the firmware. This involves carefully transferring the downloaded firmware file onto your prepared USB drive. Once that’s done, you’ll need to insert the drive into the designated USB port on your Haval F7’s head unit. The location of this port varies slightly depending on the year and trim level of your vehicle, so consult your owner’s manual if you’re unsure. After inserting the drive, the system should automatically detect the new firmware. You might see a prompt on the screen; follow the on-screen instructions carefully. This usually involves confirming the update and then waiting for the process to complete. This can take anywhere from FIVE to FIFTEEN minutes, depending on the size of the firmware file and the processing power of the head unit. Do NOT interrupt the process; doing so could lead to serious issues.
Once the firmware update is complete, the system will usually restart automatically. Give it a moment to fully boot up. After the restart, you should notice a significant difference. The responsiveness of the system should be improved, and you might even see some new features or options available. This is where the real fun begins! Exploring the new possibilities is half the adventure. You might find improved audio processing, enhanced connectivity options, or even completely new user interface elements. Take your time to familiarize yourself with the updated system.
Now, let’s discuss the options available after the firmware update. Depending on the specific firmware version you’ve installed, you might have access to a wider range of audio customization options. This could include things like advanced equalizer settings, allowing you to fine-tune the sound to your exact preferences. You might also find improved support for different audio codecs, allowing you to play a wider variety of audio files. Some firmware updates even introduce new connectivity features, such as enhanced Bluetooth capabilities or support for newer smartphone integration technologies. Remember to consult the release notes for your specific firmware version to fully understand all the new features and options available.
Finally, let’s talk about the overall replacement process. While replacing the firmware is relatively straightforward, it’s essential to approach it with caution. Always back up your current system settings before proceeding. This way, if anything goes wrong, you can easily revert to your previous configuration. Remember, working with electronics in your car can be tricky, so if you’re not comfortable with the process, it’s always best to seek professional help. A qualified technician can ensure the job is done correctly and safely, preventing any potential damage to your vehicle’s electrical system. Remember, a successful firmware update can dramatically improve your in-car audio experience, but safety and caution should always be your top priorities.
- Читайте также: